A fence estimator for your website, live in minutes
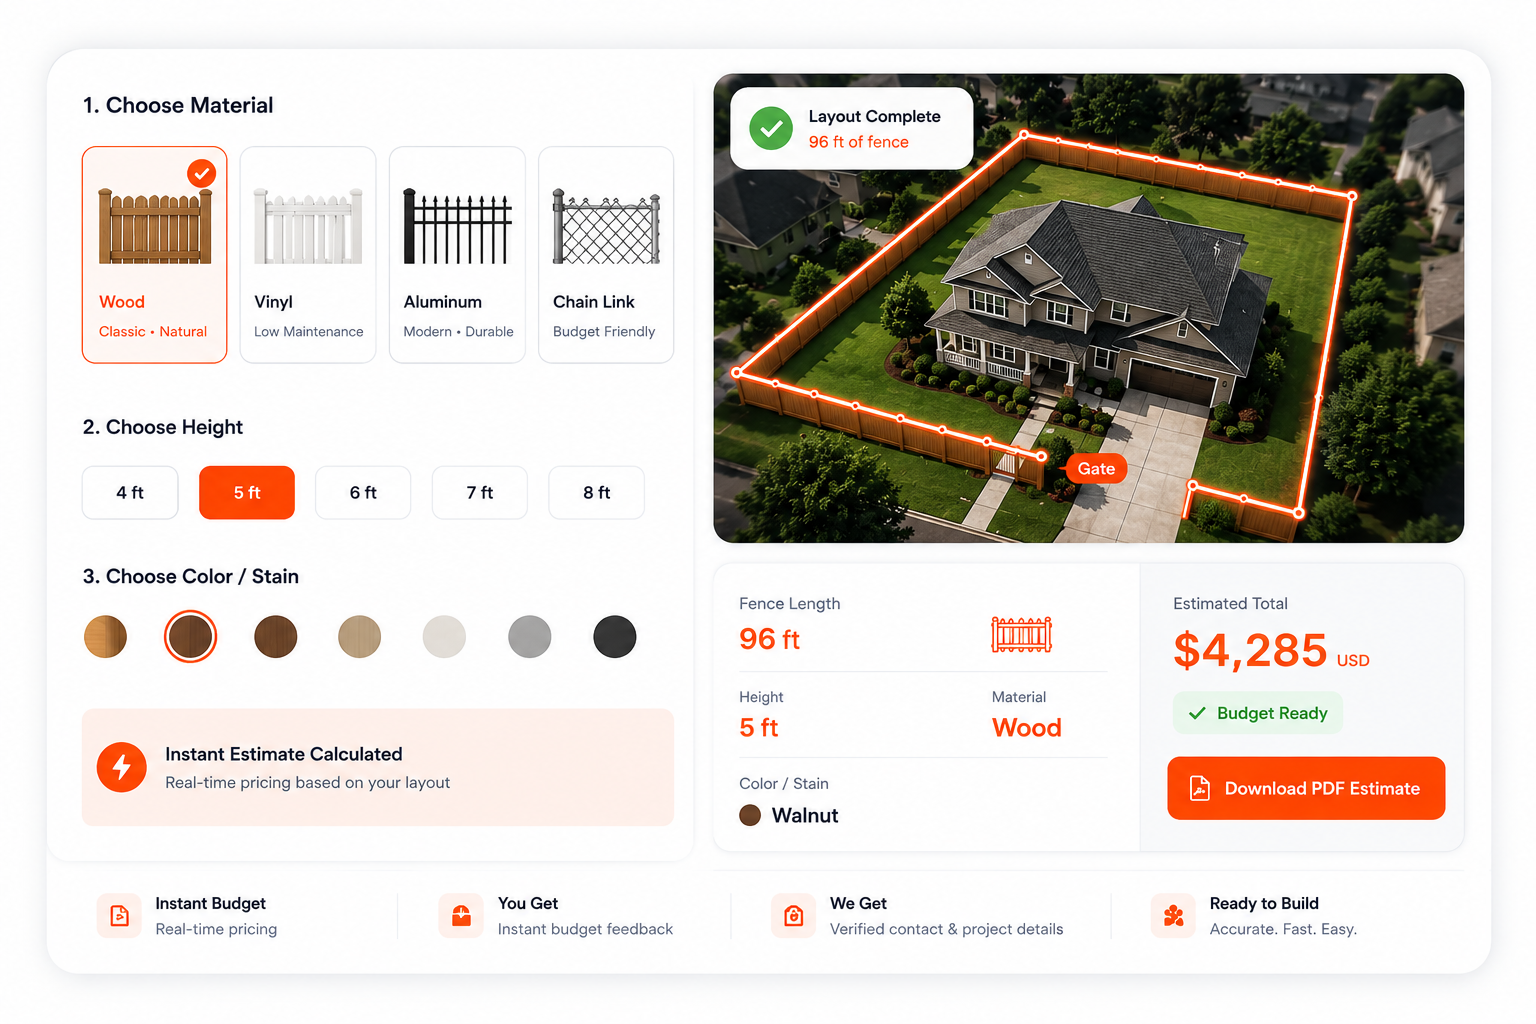
Put a satellite fence estimator on the site you already have. Homeowners draw their fence on their own yard, choose from your catalog, and see a budget range built from your rates. You get a lead with the drawing, footage, materials and budget already attached — instead of a contact form that says “need fence quote”.
- One link or one iframe
- No developer needed
- Works with any site builder
Two ways to add it
A link for any button, or an embed for any page
Both are copied from the Integrations tab in your dashboard, already filled in with your company's address. Most contractors use both: the link in the header, the embed on a dedicated estimate page.
Link mode
Your estimator has its own address on mapmyfence.com. Attach it to the "Get a quote" button in your header, the call-to-action in your hero, the sticky bar on mobile, your Google Business Profile, or the link in your email signature. Nothing to install; if your site can link to a page, it can use this.
A URL you put behind any button.
Best for sites you cannot easily edit, page builders that restrict custom code, and links you send by text or email.
Embed mode
Paste the iframe snippet into any page that accepts HTML — a WordPress block, a Wix embed, a Squarespace code block, a GoHighLevel funnel step — and the estimator renders inside your layout. Embed mode hides the estimator's own header and progress bar and uses a transparent background, so it sits inside your design rather than on top of it.
A few lines of HTML that drop the estimator into a page.
Best for a dedicated "Instant estimate" page, and landing pages for paid traffic.
https://mapmyfence.com/estimate/your-company<iframe src="https://mapmyfence.com/estimate/your-company?embed=true" width="100%" height="700px" frameborder="0" style="border:1px solid #e2e8f0; border-radius:8px;"></iframe>your-company is the handle you choose when you set up your account. A height of 700 pixels fits the map and the controls on a desktop; on a phone the estimator lays itself out for the narrower screen.
On your page
What the homeowner does on your website
Four steps, on a phone or a desktop, in your branding. The lead exists from step three onward, so even a homeowner who stops early still reaches you.
- 1
Address and satellite view
They type their address and the map lands on their yard. They see their own roof, driveway and the line where the fence will go.
- 2
Draw the fence, drop the gates
Click or tap along the fence line. Footage appears on every run as they draw. Gates snap onto the line where they place them.
- 3
Pick from your catalog
Height, material, style and colour — only the options you have switched on, with the ones you want to sell first at the top.
- 4
Contact details, then the range
They leave their name, phone, email and best time to call. Then they get a budget range built from your rates, and a branded PDF to keep.
Works with your site
Any site builder that accepts a link or an HTML block
There is no plugin to install and no theme to change. Where the snippet goes in each builder:
WordPress
Custom HTML block, or the HTML widget in Elementor and Divi
Wix
Add Elements → Embed Code → Embed HTML
Squarespace
Code block, set to HTML
Webflow
Embed component
GoHighLevel
Custom JS/HTML element in the funnel builder
Duda
HTML widget
Shopify
Custom Liquid section, or a page in HTML mode
Plain HTML
Paste it where you want it on the page
Step-by-step screenshots for each builder are in the guide how to add an instant fence estimator to your website.
Your branding
It looks like your company, because it is your company's estimator
The homeowner is on your site, sees your logo, reads your wording and meets your people. MapMyFence is the machinery underneath.
Your logo, your company name
Upload a logo and choose whether your company name sits beside it. The PDF the homeowner keeps carries the same branding and your contact details.
Your disclaimer under the price
Write the sentence that appears beneath the budget range: "subject to on-site inspection", your licence number, whatever your state or your lawyer wants said.
Your next-steps message
After the estimate, the homeowner reads a message from you. Tell them who will call, when, and what happens at the site visit.
Your sales team on the page
Show the people who will actually turn up, with name, photo and phone. Homeowners are more comfortable booking a visit from a face than from a form.
Your tag manager and pixel
Add your Google Tag Manager container ID and Facebook Pixel ID in settings and they load on the estimator, so your conversion tracking sees the whole journey.
Works on the phone in their hand
Most homeowners find you on a phone. The estimator is built for touch: the map fills the screen and the controls live in a sheet they pull up from the bottom.
For your web developer
If someone technical is doing the embed
The estimator is a normal iframe. These are the hooks it offers to the page around it. None of this is required — the snippet works on its own.
Messages posted to the parent page
The frame calls window.parent.postMessageat three points, so your page can react — scroll to the frame, fire a conversion, show a thank-you.
mapmyfence:step{ step: 1 | 2 | 3 | 4 }The homeowner moves forward or back a step.
mapmyfence:estimate{ budgetLowCents, budgetHighCents }The budget range has been calculated.
mapmyfence:lead{ leadId, status: 'submitted' }The lead is complete and the PDF is saved.
window.addEventListener('message', (e) => {
  if (e.data?.type === 'mapmyfence:lead') {
    // e.data.leadId — fire your own conversion event here
  }
});
Google Tag Manager events
When your GTM container ID is set, the estimator loads your container and pushes these events to the data layer as the homeowner progresses. Build a trigger on the last one for your conversion tag.
estimator_location_setestimator_draw_completeestimator_materials_selectedestimator_lead_submitted
Embed mode and attribution
?embed=true hides the estimator's header and progress bar and makes the background transparent. The estimator reads UTM,gclid,fbclid andmsclkid from its own URL. On a campaign landing page, append the UTM parameters to the iframe src; otherwise the lead is recorded as coming from your website, with the page URL attached.
Where the lead goes next
Every completed lead is emailed to you and, if you set a webhook URL, posted as JSON to your CRM with an HMAC-SHA256 signature you can verify. See what arrives with each lead.
FAQ
Questions about putting a fence estimator on your website
Do I need a developer to add a fence estimator to my website?
No. In link mode you attach a URL to a button, which every site builder lets you do. In embed mode you paste a short iframe snippet into an HTML block. Both are copied from the Integrations tab in your dashboard, already filled in with your company's address, and the whole job takes a few minutes.
Will it work on WordPress, Wix, Squarespace or GoHighLevel?
Yes. Anything that lets you paste HTML can host the embed, which covers WordPress (including Elementor and Divi), Wix, Squarespace, Webflow, GoHighLevel, Duda, Shopify and hand-built sites. If a builder blocks custom code entirely, link mode still works because it is just a link.
Does the estimator slow my website down?
The estimator runs inside its own frame, so its map and code do not load into your page's bundle. Put the embed on a dedicated estimate page rather than on every page of the site, and add loading="lazy" to the iframe if it sits below the fold.
Do I need a separate estimator for each service area or crew?
No. One estimator covers your whole company. You draw your service area in settings, and leads outside it arrive flagged. If you run several crews or branches, they share one catalog and one lead pipeline, and you assign leads to people from the dashboard.
Can I put it on more than one page, or on a landing page for ads?
Yes, and there is no charge for it. The same snippet can sit on your home page, a dedicated estimate page and any number of campaign landing pages. Because the estimator reads tracking parameters from its own URL, add your UTM tags to the iframe address on each campaign page if you want the lead recorded against that campaign.
How does lead attribution work when the estimator is embedded?
The estimator looks at its own URL first: UTM parameters, a Google Ads gclid, a Facebook fbclid or a Bing msclkid are recorded on the lead. Failing that it looks at the referring page. When it is embedded on your site, the referrer is your site, so the lead is recorded as coming from your website with the page URL attached. To attribute paid traffic precisely, send the ad to your estimator link directly, or add UTM parameters to the iframe address on that landing page.
What does the homeowner see first, the price or the contact form?
They draw the fence and choose materials first, then leave their contact details, then see the budget range and receive the PDF. The lead is created the moment they enter their details, so if they stop before the range you still have their address and drawing, marked as dropped off.
Can I change how it looks?
You control the logo, whether your company name appears beside it, the disclaimer under the price, the message after submission, and the sales team shown on the page. Embed mode removes the estimator's own header and uses a transparent background so it takes on the surroundings of your page. Colour theming beyond that is not something you set yourself today.
Is there a fence estimator I can add to my website for free?
MapMyFence is free for 30 days with every feature on and no card required, after which it is $149 a month or $99 a month billed annually. There is no per-lead fee and no charge for putting it on several pages.
Last updated:
Your own link and snippet are on the Integrations tab once you start a trial. The demo account's estimator is at /estimate/xyz-fencing.
Get started
Put the estimator on your website this week
Set your prices, paste one link or one snippet, and start receiving leads with a drawing, footage and a budget range attached.
No credit card required.